Showing posts with label DIYs. Show all posts

DIY Room Ideas

I have done a post before called Room Ideas in which I showed you some features of my bedroom but all of those were things I bought. Today I thought I'd show you some fairly cheap DIY projects. I only have two for today but if you like them let me know because my sisters want me to do some DIY things for them so I will be doing more.

Firstly, I made this cute little decoration to hang over my desk. I bought the string which has butterflies on it and pegs from Michaels in the sale for around $1. If you can't find these, I would suggest using some wooden pegs you already have or buying some from Dollar Tree or Poundland and painting them different colours and patterns. For the string, just use normal string, lace or ribbon and cut out butterflies to stick to them with a hot glue gun.


I hung the string up with blue tac and pegged on some of my Photo Booth photos with friends and family. I just think that this is a really cute idea to decorate your room and it only cost $2 to make!


My next DIY is this really cute way to hang necklaces. I asked my little sister to find me some pebbles in the garden or you could buy some. I washed them off and used a hot glue gun to stick them to the inside of my wardrobe but you could put them on your wall too. This would also look great if you painted them first.

If you try either of these ideas and want to send me pictures then my email is pinkcupcake7blog@yahoo.com and I'd love to see them.

xoxo PinkCupcake xoxo
0

DIY Gift Idea #1

Hey guys,

I have decided to start a small series on gift ideas. I'm not sure how often I'll do these posts but I am starting to get more into the idea of personalising my presents. Let me know if you like these posts and I'll be sure to do more.


So my older sisters birthday is coming up and she always gets me great presents but this year, I really wanted to think more about the perfect present rather than spending my money on clothes or something like that for her. I wanted my present to be more personal so heres what I got her.


Firstly, I got a mason jar from Walmart for around $8. I got quite a large one because I'm going to be filling it with lots of gifts. The one I got her has a handle and a straw. Ideally, it wouldn't have but it was the only larger one I could get. Then to the mason jar, I did some DIY to it to make it look nicer and more present like. In the picture it is not like that thought because I hadn't done it yet. I kept in mind the colours of her room because I thought that she may want to use it for cute storage in her room rather than as a drinking cup. For more detail on how I did it like this, see my DIY on it which I'll link here.

Then I went to Walmart for small gifts to fill it with. I wanted the gifts to be quite thought out so I knew she'd like them but these small things are presents that I'm sure most people will love. I bought some Ice Breakers because I'm English and they are not available in England and I know she'll like them. I also got another Eos for her. Previously, I've got her the strawberry sorbet one which I know she loves so I got her another one in Sweet Mint. I also picked her up a red lipstick from Maybelline and a lip liner to go with it because she has really wanted a red lipstick and always borrows mine. I also got her a coconut face mask because she loves coconut and also a Burts Bees Lipbalm in Coconut and Pear.

As for from other shops, I also got her a Bath and Body Works Coconut Hand Sanitizer and the Twilight Woods body mist as well as a Mac eyeshadow palette in Smokeluxe because she loves Mac but has too many other things to spend her money on. I also got her the Popcorn lip scrub from Lush.

I really hope she loves her gift and I'm sure she will. I think this is a really cute, personal gift and I know that I'd love to receive it. I also like the fact that it is full of little things because I personally like to get lots of little things rather than one big thing. If you try out this gift idea, let me know what you put in your mason jar and if the person likes it. I'm sure they will!

xoxo PinkCupcake xoxo
1

DIY: Lipstick Holder

As my lipstick collection is growing and I would like to re-sort out my makeup storage so I decided I wanted to have all my lipsticks on display by storing them in a lipstick holder. After researching lipstick holders I realised that they cost a lot of money for something that was just a piece of plastic. I watched a youtube video on how to make one yourself and thats what I am going to show you today.


Things you'll need:
Glue gun or double sided tape
7 day Pill organiser (I got mine for a dollar from Dollar Tree)
Scissors

Instructions:
1. Take your pill organiser and snap off the lid to each of the days and throw them in bin. Be careful not to snap the plastics though. I accidentally snapped a few of the boxes.


2. Now take all of the pill boxes out of the big box and line it with double sided tape or glue. 


3. Now secure your boxes in the big box.

4. This is optional but you could cut off the lid of the box.


Now you have your lipstick holder! I think this is a really inexpensive way to store your lipsticks instead of spending a lot of money on something that is exactly the same!


xoxo PinkCupcake xoxo

2

DIY: Hair Bows

Hey guys,
I've always loved hair bows but have always spent my money otherwise because lets face it, when you can choose between clothes and a bow, you'll usually choose the clothes. So I decided to try to make my own. Here's what I did!

Things You'll Need:

  • Material
  • Hot Glue Gun
  • Scissors
  • Hair Clips


 What to do:
1. First take your fabric and cut it into a square. Use whatever fabric you want your bow to be but before going out and buying some, I would recommend seeing if you have any already from previous projects or cut up some old clothing or something like that because you don't need very much.

2. No roll the fabric over until it is a long strip of fabric, the thickness that you want your bow to be. Use your hot glue gun to glue it to stay in place and cut any frayed pieces of fabric off the edges to neaten it up.

3. Now cut any material off the sides of the fabric to make it the size that you want your bow to be and fold the ends in and glue them.

4. Then pinch the middle of the fabric to scrunch it up into a bow shape.


6. Glue the middle pinched bit together so that it stays like that.


7. Now take a small section of fabric and secure it around the bow to cover the pinched middle bit. Glue it down and now your fabric should resemble a bow.

8. Finally, secure your bow to a clip or hair grip and leave the glue to set. Now your bow should be ready to use!


i hope you enjoyed this tutorial. It was very hard to explain what I was doing but you can follow the pictures and they should help. Send me pictures of your bows at pinkcupcake7blog@yahoo.com.

xoxo PinkCupcake xoxo
0

DIY: Key Decorations

Hey guys,
So today it's Friday and Friday's DIY day. I am going to show you a really cute way of decorating your boring keys. I did not come up with this, I saw it on Trusper Tips app and I really liked it so I recreated it and decided to show you today.


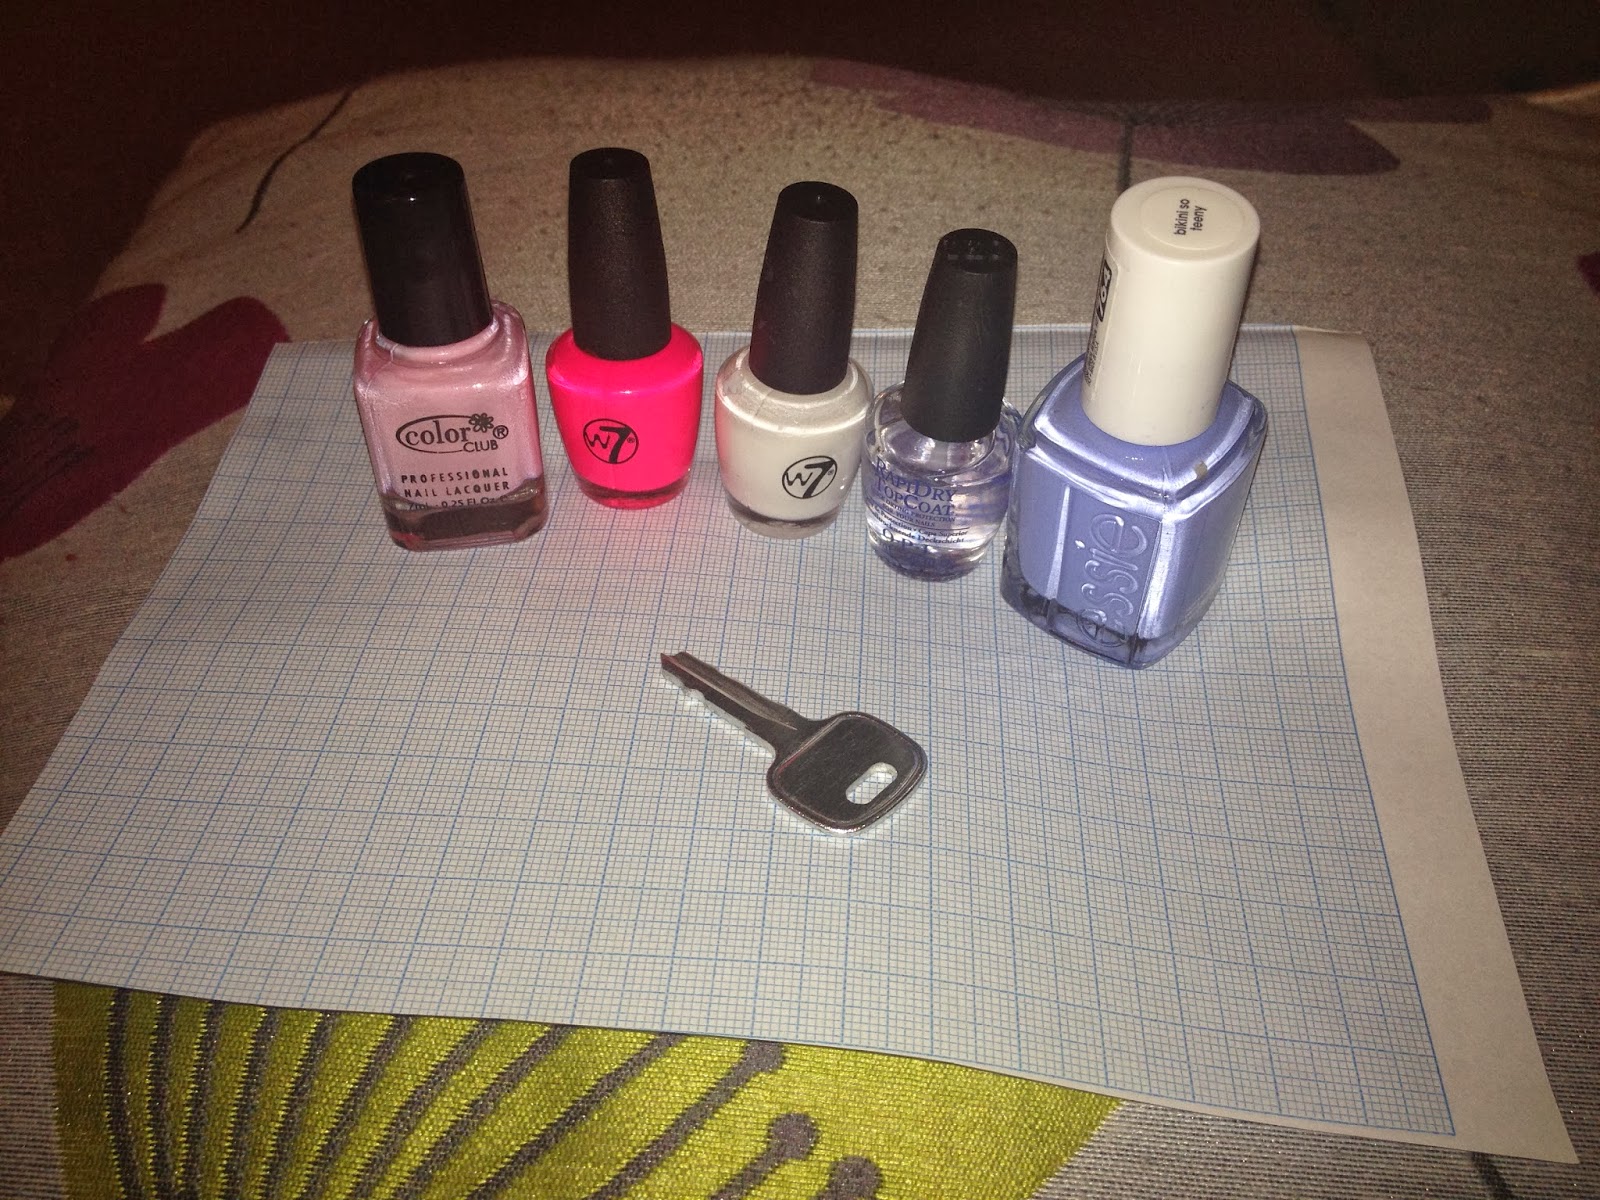
Things You'll Need:
A Key
Nail Polish (Whatever colours you want your key to be)
Clear Coat Nail Polish
Small, thing paintbrush

I'm going to show you how to make the blue key above but it is pretty simple on how to change the pattern to make it how you want.

1. Clean your key. This is not a vital step (I have to be honest and say I didn't do this) but it is best to clean it.

2. Paint your key with a base colour. For me, this was bikini so teeny by Essie. Make sure the paint on the part of the key with grooves is not as thick to ensure that the key still works.


3. No paint your pattern on. I started by taking a white polish and painting messy white circles all over the key.

4. Then I took a pale pink colour and put it lightly on top of the white blobs.


5. Next I used the small paint brush to paint thin bright pink lines all over the blobs making it look like a rose.

6. Then I took a dark blue/green colour and drew leaves on the flowers. This doesn't have to be too neat, it actually tends to look better a little scruffy.


7. Now paint a sheer clear coat over the key once it's dry. I left one side to dry at a time but you can loop a grip through the hole and tape it to a desk to dry both sides. Just make sure the key is fully dry before painting the top coat otherwise the polish will smudge and the pattern will be messed up.

I hope you enjoyed this DIY tutorial and comment below if you have any DIY projects or posts you'd like to see. Thank you!

xoxo PinkCupcake xoxo
3

DIY: Makeup brush holder

Hi guys!
Today I'm going to show you how to make a cute little pot for your room. You can store lots of things in this like pens, lip balms, money but I use it to hold my makeup brushes. My best friend harrietjacksonx uses hers as a wish jar and she's done a post on how to make her wide jar so check that out, it's a great tutorial.

I used all materials that I have around the house to make this. Heres what you'll need:

  • Some kind of pot. (You can use a glass, cup, empty candle container, or I just used an empty food jar.)
  • Spray Paint (I used red spray paint but you can use whatever colour you want. I didn't have any so I borrowed some from my friend so before buying some ask around to see if someone will lend you some instead.)
  • Paper
  • Pencil
  • Tape or glue
  • Newspaper 
  • Disposable gloves or a carrier bag

1. So firstly, if your jar has a plastic label on it, soak it in hot water for 30 minutes. Then peel of scrub the label off. Then leave it to dry upside down or dry it yourself.

2. Now take some paper and draw a design on it. I drew love hearts with my paint being red but you can draw whatever pattern you'd like. Also make sure it will fit onto your jar.


3. Now cut out your design.

4. Now using tape or glue, stick it to our jar. If you are using tape, make sure your roll it into a small ball and then stick it down.

5. Next, go into a room with lots of air or outside. I went into my garage and let the air come in. I would have done it outside but it was a windy day so if you can, I would suggest doing it outside to release the fumes. Anyway, in your chosen area, lay lots of newspaper or scrap paper down and put your jar onto of it.

6. Then shake your spray paint, there should be instructions on the back informing you on how to use it correctly so follow those and spray paint your jar. Try and get the colour as evenly distributed as possible. Also make sure you cover your mouth and nose with a mask or your shirt to avoid inhaling fumes. Also I would suggest putting some disposable gloves on to avoid getting the spray paint only your hands when turning the jar or if you don't have any do like I did and put a plastic bag over your hand secured with a hair band around your wrist.


7. Now leave it to dry for as long as it says on the back of the can. For me, this was 3 hours but leave it for longer if possible just to allow it to dry completely.

8. Once your jar is dry, I fiddled around with the love hearts to make them a bit more 3D but you can change it to however you like it. Now your makeup brush holder is ready to use!


If you try this out, be sure to send me a picture at pinkcupcake7blog@yahoo.com. I would love to see how they turned out and get more ideas for the future!

xoxo PinkCupcake xoxo
1

How To: Making your own Lip Exfoliator/Lip Scrub

Hey guys,
So you may have seen my 'How To: Making your own BB cream' post not too long ago. Well, I really enjoyed making that post so I decided to make another DIY makeup products post today. I find that making your own products from ingredients that you already have in your house is a much cheaper way of getting new products. Today I'm going to be showing you how to make a lip exfoliator.


Things You'll Need:
  • Olive Oil
  • Sugar or Caster Sugar
  • Honey
  • Vanilla Essence (optional)
  • Food Colouring (optional)
  • Measuring spoons
  • Jar to keep it in

1. Firstly, take the jar that you are going to keep your lip exfoliator in and put a tablespoon of caster sugar or sugar into the jar. If you want a deeper lip scrub then use normal sugar but caster sugar is generally softer to the lips. This will make your lips smooth and exfoliate them. You can obviously add more or less depending on how much you want to make but I find that using this much makes a good amount.

2. Then add 1/2 - 3/4 of a teaspoon of olive oil. This isn't a set amount, I find that after I've stirred it, I end up adding a little more to make it of a better consistency but this is up to you. Stir the mixture and it shouldn't look to liquidy, it should be more like sugar at this point.


3. Now add a small amount of honey. This is really a trial and error thing with the amount because the honey makes the mixture stick. Just add a small dribble and then work from that until the mixture is stuck together. 

4. Now the next step is optional. You could just leave the lip scrub like that or you can add flavouring. Personally, I prefer to add some vanilla essence to make it taste a little better because after all, you are putting it on your lips. You can also add peppermint extract, lemon juice or anything thats going to add flavour to your exfoliator. Don't add very much, only a few drops because you want to make the flavouring very subtle.

5. This step is optional too. If you want to, you can add food colouring to make your lip scrub tinted and leave a nice colour to your lips or you can leave it natural. I added some red food colouring to make it tinted. I would only use red or pink food colouring but it is up to you. Don't overdo this step, only add a couple of drops because food colouring does stain and you don't want to overly stain your lips. I only added a few drops to make it a rosy pink but then I added some more to make it a slightly darker pink colour.


6. Now your lip scrub is ready to use. If after a while, your scrubs mixture begins to separate, put in in a fridge and it should stick back together. Also since you have used all edible ingredients, once you've finished exfoliating your lips, you can lick it off, that is why I like to add flavouring.


Thank you for reading! If you having any tips on making this or want to tell me how this worked for you please comment below or email me. Thanks!

xoxo PinkCupcake xoxo
3

How to: Making your own BB cream

So for all you makeup horders out there, this will be a great post for you. I myself, love to collect makeup but buying a lot becomes very hard when you only have so much money. I've desperately been wanting a good BB cream to use because I don't feel my skin needs a foundation as I am only a teenager and don't want to use too many products on my skin everyday. My skin has also been very dry recently and I thought that a tinted moisturiser or BB cream (Beauty Balm) would help it but like I said, one wasn't in the budget so I decided to use products I already had to make my own.

Things You'll Need:
Moisturiser
Primer (optional)
Suncream (optional)
Foundation
Makeup Brush or sponge

1. So if you're wanting to make a large portion of BB cream at one time, I would suggest getting a small pot or container to keep it in but in my case, I just like to make a little amount each day on the back of my hand, either works fine. First you'll need to put some primer in the pot or on your hand. I used Rimmel's Fix and perfect primer. The amount depends on how much you want to make but remember not to use too much primers it doesn't need to consist of much primer, just enough to keep the BB cream on your skin all day.

2. Now add some sun cream. Because I used Simple's Protecting Moisturiser, I didn't need to add sun cream but if yours doesn't I would recommend adding some. This step isn't crucial but most BB creams tend to have sun cream in them. You don't need a lot of this either.


3. Now add your moisturiser. Like I said before, I used Simple's Protecting Moisturiser but any moisturiser that works for you will be fine. Your BB cream will consist of mainly moisturiser and foundation so you should use more of this product than the previous ones but still not as much as your foundation. Using too much moisturiser can make your BB cream look bad on your skin.

4. Now take your foundation. It is often enter to use a foundation that is a shade darker than your skin tone because the moisturiser can make it lighter but if you for have any darker foundation then using your normal shade should work fine. I used Rimmel's True Match Foundation in the colour Classic Ivory. You'll need to add the most of this foundation because the BB cream should mainly be foundation. I used one full pump which lasts me one full use but if you're making enough to last longer then you'll obviously need to use more.


5. The final step is to blend all of the products together. If you made the BB cream on the back of your hand, use a makeup brush or I used my Beauty Blender in a pat and twist motion to blend the products together but if you are making it in a pot, I would suggest using a spoon, stick or the end of a makeup brush to blend it. After that, you should have a BB cream ready to use but you can change the cream by adding more products to how you like it.


I hope you enjoyed this tutorial. It is obviously easier to buy a BB cream but I think that this DIY trick is a nice way to save money and use up products that are sitting at the back of your cupboard. If you have any makeup tips or requests of posts you'd like me to do in the future, please comment below or email me at: PinkCupcake7blog@yahoo.com. Also let me know if you like these types of posts and I'l do more in the future.

Xoxo PinkCupcake xoxo
3

copyright © . all rights reserved. designed by Color and Code

grid layout coding by helpblogger.com